There are several ways to reach the formation page in goalunited. The main way is to use the menu bar at the bottom of the screen. By clicking on the day and time info of the match announcement at the top of the screen, you get straight to the formation of that match. Pushing the playfield button next to one of the scheduled matches in All fixtures also leads here.
If you want to manage the formation for a specific match other than the next one, you will have to choose it using the fixtures table. The other two ways always lead to the formation of the next match. In the first line, the opponents and the time will be shown.

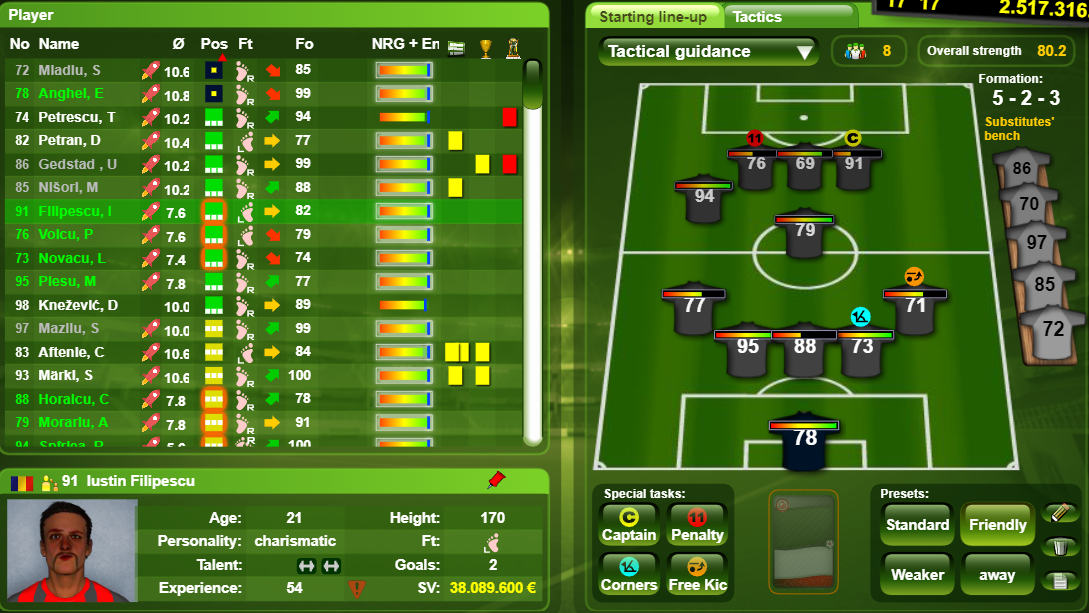
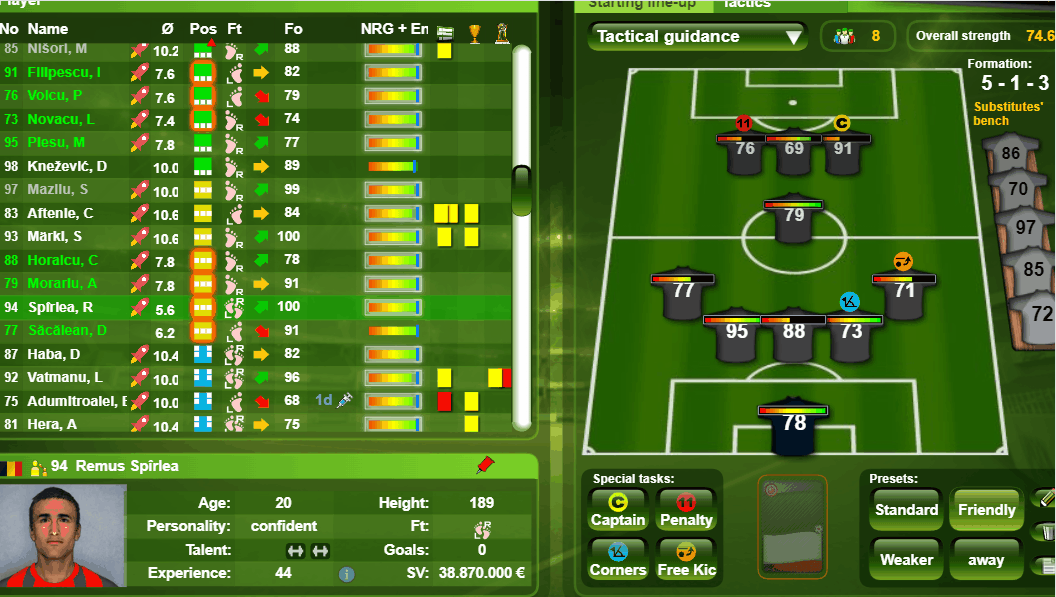
All relevant data about your players is displayed in compact view on the left-hand side, with further information about one selected player below it. Double-clicking will open the details panel as usual.
Players in the starting eleven are highlighted green, substitutes are marked grey.
Via Drag and drop, the players can be moved from the list onto the playfield or the bench. To remove a player from the starting eleven, he must be dragged back to the list.
Generally, a player can be put in each possible position. However, his strength won't be the same in all of these positions. It depends on his specific skills and his current trained position. (more about positions)
Players with nearly similar skill values on one specific position should be distinguished by their current energy, form and endurance. Further criteria are the player’s height, special talents, the stronger foot and the character.
Injured players cannot be nominated, but bruised players can.

The field is subdivided into 9 sectors, which are numbered the same way as the numpad on the keyboard.
When a player is dragged over the playfield, the sector division will show up. The most suitable sectors are highlighted in green. The bar on top of the player will show you how suitable the exact location on the field is for the player.
The goalkeeper's sector (number 0) is a special case and consists of only one position.
Main and sub-positions
Each sector has one main position and several sub-positions. The Main position is the central position of the sector. In the 6 wing sectors, the main position is the middle outside position; In the 3 center sectors, the main position is the exact middle.
In the screenshot below, the two highlighted players are in the main positions of the sector.
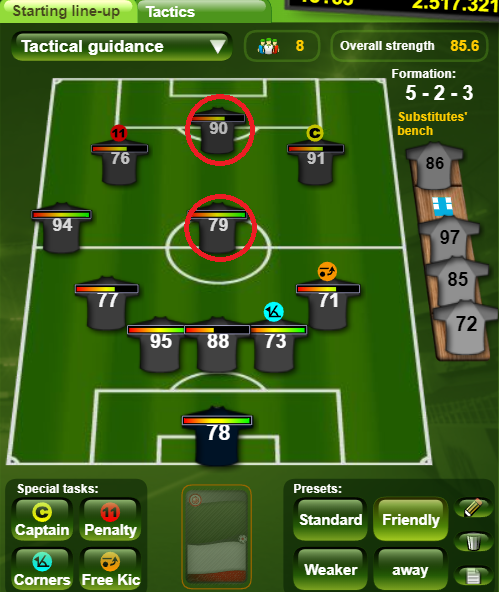
When a player is not set in a main position, he is standing in a so-called sub-position.
By standing on a subposition, a player can be put nearer to the adjacent quadrants and individually influence the ongoings in that sector.
Players always have the most effect on the sector they play in, and a small effect on the rest of the field. When a player is playing on a sub-position, he affects the neighboring sector(s) more, but in return, he does not affect his one sector as much anymore.
A player who is placed right on the baseline will not have any effect on the rest of the field anymore and all his energy will go to his own sector.
Using the Halftime directions and substitutions allows you to make tactical adjustments to your formation during the first half of the match. This gives you the flexibility to respond to how the game is unfolding, whether you need to strengthen your defense, add more attacking options, or adapt to your opponent’s strategy before halftime.
You need to assign 4 special jobs to the players on the field: Captain, corner kicks, free kicks and penalty kicks. To assign the job to a specific player, simply click on the symbol at the bottom and then on the player to assign it to.
Check the special jobs page for more information on who is suitable for each job.
If you have 8 or more different personalities in your line-up, you will receive 10% performance bonus for the whole line-up. You can see the bonus in your player ratings in the newspaper.
The effort level decides how much energy your players will put into the match. Some matches are just for fun, others are hard fights. Most matches will probably be league matches.
There are several levels to control and influence the effort and the playing strength of the players. The higher the level, the more engaged the players will be on the pitch.
The higher the effort, the more energy is used by your players — And of course, the higher the effort, the harder your players will play, raising the chances for cards and injuries.
The players need a specific minimal energy to play at each effort level. If a player's energy is low, he will mainly suffer from the negative effects of a higher effort level (like a higher risk of injuries and yellow cards, a higher loss of energy). The positive effects will only be there with high enough energy.
The energy consumption is also affected by the player's endurance. The lower the endurance, the more energy is used. At an endurance level of >90 the effects are as follows:
Effort | Energy required | Energy consumed |
50% | 0 energy required | +- 1.4 energy used |
75% | 25 energy required | +- 3.1 energy used |
100% | 50 energy required | +- 4.9 energy used |
125% | 75 energy required | +- 6.9 energy used |
150% | 100 energy required | +- 9.2 energy used |
When setting the effort level, you should take into consideration the importance of the match. In friendly matches for example, low effort should be chosen.
The loss of energy as well as the gain of experience and endurance will be dependent on the time the player has been on the pitch.. If a player doesn't play a complete match — because of a red card or an injury — or if overtime is played, the values will be calculated proportionately.
It is generally recommended to control the engagement level with care!
Read more about energy in the energy article!
In the first couple of weeks after founding a new club it is the best choice not to set a tactic. With that, no sector will have a bonus or malus. Later on this choice can also be made if the trained tactics are thought to have more disadvantages than advantages.
To successfully play a tactic, it should be trained to at least 80%. The dropdown will show all trained tactics in white to make the choice easier. (More about tactics training)
Choosing the right tactic is one of the more complicated chapters of goalunited. There are different approaches to what is the right tactic to play at what time and against which opponent. One way is to try to win the opponents' weak areas by strengthening those sectors in your own formation, the opposing tactic is to strengthen those areas that the other team is particularly strong in. In any case, it is a good idea to check on the last matches of your opposing team to see what his tactics are and where his strengths and weaknesses are.
Over time, you will have a quite good feeling for choosing the right formation and tactics when playing against specific kinds of opponents.
The formation overview does not show how much better a single player will be playing in a specific sector but how the sector's strength will be influenced. In the visualization, the effects are shown in different colors and in percentages (0% means normal values).
The higher the sector strength, the higher the probability of winning this sector against your opponent and the more your players will try to lay emphasis on playing within this sector. So you should choose a tactic that will fit your formation to get the highest effects. After the match, you can read in the Newspaper match report how well your players did in that match and in each sector.
You should try to win as many quadrants as possible to increase your chances of winning the match. At the same time, you should try to lose as few (better none) quadrants clearly against your opponent. All quadrants have nearly the same importance on the match, although the corner quadrants' effect is slightly less.
One of these two ways of marking your opponent's players must be selected before every match. Both will only have advantages and there is no malus.
Man marking
The more defensive variant enforces the defense quadrants (1-3) by 7.5%.
Zonal marking
This variant allows better playmaking and enforces your midfield quadrants (4-6) by 5%.
With the offside trap, your players will try to let the opponent get caught in an offside position. A successful offside trap will end the attack instantly; if it fails, though, it creates highly dangerous situations. Only use if well-trained.
Those three visualizations will help make decisions easier when creating a formation. You can also see the overall strength of the team on the field at the top right and the number of different personalities on the field in the middle. The strength values of the players on the field are summed up.
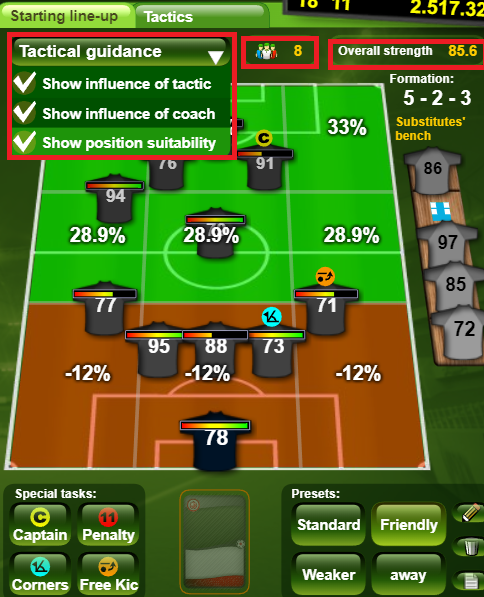
Tactics influence
By ticking this mark, you can switch on a visualisation of the tactic's influence on the team's strength.
Coach influence
This shows the influence of the coach. Depending on the philosophy of the coach, he will give bonuses to different sectors.
Position suitability
If you uncheck the position suitability, you remove the bar above the player to see how well he will play in each position.
Up to four different formations can be saved as presets to easily recall them later. With this, the formation does not have to be made from scratch every time.
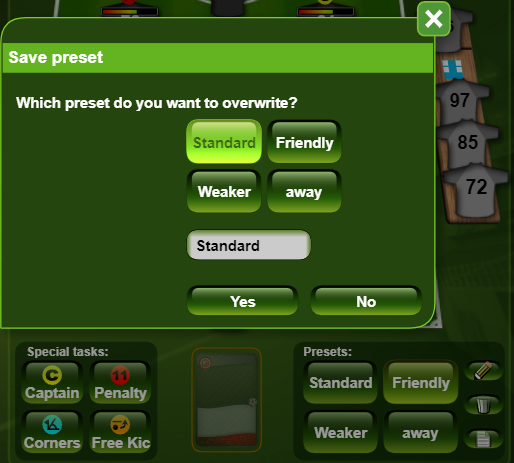
To save a preset, the formation must be set completely (11 players, tactics, and special jobs). Then click on the pencil button, select one of the four possible presets in the dialog and enter a name for the preset. Save by clicking 'yes'.